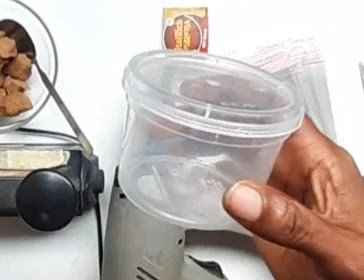
Here we will learn how to package kuli kuli and other snacks with hot gun sealer all for your small business.
Outline
- Items required
- Get your packaging plastic
- Paste your paper sticker label on your product
- Get your nylon for sealing
- Start sealing with the hot gun sealer
- The finished product
Check out the video
Contact us
Items required
Below are the items you require for packaging kuli kuli with hot gun sealer
- Tape for measurement
- Your packaging plastic
- The item you want to package
- Nylon for sealing
- Hot gun sealer
- Impulse sealer
- A pair of scissors
- Label
Get your packaging plastick
Your need to visit the packaging stores in your location to search for the packaging bottle or container that will be suitable for what you want to package. You might also order them online. In my case i chose the above plastic container because it is handy, cheaper, beautiful and easy to seal. Here in Nigeria in this 2023, I got that plastic for N50 for one. That is the wholesale price for the plastic. The plastic is transparent and good for small business packaging for snacks and other food items.
With your measurement scoop, add your kuli kuli inside the plastic container. Remember you should always have standard measurement for all your products. In my case. I used spoon to transfer the items inside the packaging plastic.
After you have done the transfer, the next thing is to tightly cover the container.
Paste your paper sticker label on your product
You would have gone to printers to design your label/brand and print it on a paper sticker. I advice you make small or medium size designs. Avoid printing large label as this might attract more cost and expenses. Paste the label on your packaging plastic.
Get your nylon for sealing
The next step will be to get the nylon you will use to seal up the container. Make sure the nylon is not too thick nor too thin. In my case I used an everyday glass transparent nylon which most businesses use for packaging. You will get such nylon in the packaging shops in your location. Measure the circumference of the cover of the plastic, add extra quarter inch, this will be the provision for sealing up the ends with the impulse sealer. Also get the length of the plastic and and extra one and half inches to it. This will be the provision for sealing with the hot gun sealer.
In my case, the circumference of the cover was 10.5 inches so after adding a quarter inch, the width I will cut in the nylon will be 10 inches and 3 quarter. The length of my plastic bottle was 2.5 inches, after adding extra 1.5 inches, the length I will cut in the nylon will be 4 inches.
Transfer the the measurement to your nylon. Cut out the measured nylon with your pair of scissors.
Fold the nylon into two equal part then seal the end with your impulse sealer. If you do not have impulse sealer, you do not need to worry, just use your candle to do the sealing. Click here to see my tutorial on how to seal with candle.
Start sealing with the hot gun sealer
Wear the sealed nylon on the product and position it well. Allow the product to be at the center of the nylon.
Get your hot gun sealer, turn it on and turn it to the lower or the higher heating degree. As for me I like using the higher heating degree. While holding the bottle just like it is displayed in the picture above, seal the top part of the plastic first. While sealing, you have to make sure you are turning the plastic round so that the hot gun sealer will not melt any part of the plastic and this sealing should not take more than 5 seconds.
After sealing the top, you position the bottom upward and seal it too in few seconds just like you did when sealing the top.
Finally, you seal the middle part and make sure you keep turning the container as you are sealing to avoid melting.
The finished product
Once you followed all the processes accurately, I assure you that your final product will be a beautiful one just like the one above. At this stage you can go ahead to distribute, market, export of even sell the products.
Check out the video
You can check out the video tutorial above. You can also subscribe to your YouTube channel by clicking here.
To get my course on how small businesses can print label on their packaging nylons without any printing machine nor any printing experience click here
To learn ogbono packaging business click here.


hi
ReplyDeleteFantastic overview of KuliKuli packaging solutions! For businesses seeking enhanced packaging performance, Kingchuan Packaging offers top-tier Heat Sealable Pet Film. Their films deliver exceptional clarity, excellent heat sealing strength, and consistent thickness—perfect for preserving freshness and safeguarding product quality. With flexible customization options and reliable compatibility with modern packaging lines, Kingchuan ensures your KuliKuli packaging stands out on the shelf.
ReplyDeletePost a Comment
Leave your comment below